
There are four practical ways to handle shopify checkout customization: the checkout and accounts editor (visual branding and app blocks), checkout apps and Checkout UI extensions (merchant-facing blocks and post-purchase offers), Shopify Functions (server-side discount, shipping, and validation logic), and
the CheckoutBranding API (advanced visual control on Plus). Pick based on what you’re actually trying to fix, not what sounds most impressive.
Store owners who want a branded checkout that matches their storefront, fast, should start with the editor and a well-reviewed app. Developers solving for custom discount stacking, shipping rules, or fraud checks need Functions. If you’re still hunting for checkout.liquid, stop. Shopify sunset it, and Checkout Extensibility is now the only supported path forward.
- Checkout and accounts editor: logo, colors, fonts, background, basic app block placement
- Checkout apps / Checkout UI extensions: merchant-facing widgets, upsells, custom fields
- Shopify Functions: backend logic for discounts, shipping, payments, validation
- CheckoutBranding API: granular visual control, mostly a Plus-tier tool
TL;DR:
- Customizing checkout branding with the editor is quick and simple on all plans, but advanced visual styling requires Shopify Plus and the CheckoutBranding API.
- Shopify Functions are essential for server-side logic such as complex discounts and shipping rules, especially when themes and apps cannot handle specific cases.
- Post-purchase and order status page customizations enable additional revenue through upsells, surveys, and tracking, but some features need shop access approval before launch.
- Testing should be comprehensive across all payment methods, devices, and customer markets on a development store before deploying to avoid revenue loss and bugs.
- Most custom checkout modifications can be done without a developer, but complex logic with the API or Functions benefits from professional development support to ensure reliability and maintainability.
Table of Contents
- What Shopify Checkout Customization Actually Changes
- How Do You Customize Shopify Checkout Branding?
- Checkout Apps vs. Custom UI Extensions: Which Do You Need?
- What Tools Do Developers Need for Custom Checkout Logic?
- Can You Customize the Thank-You and Order Status Pages?
- How Should You Test Checkout Changes Before Launch?
- Do You Need Shopify Plus for Checkout Customization?
- Pre-Launch Checklist for Checkout Changes
- When Should You Bring in a Development Partner?
- Get Expert Help With Your Shopify Checkout
- Key Takeaways
- Sources
What Shopify Checkout Customization Actually Changes
Each of the four routes touches a different layer of checkout, and confusing them wastes time. The editor changes what customers see. Functions change what checkout does. The Branding API changes how precisely you can style it. Apps sit somewhere in between, adding functionality without touching code.
Here’s how they map to the problems merchants actually bring us:
- Branding mismatch (storefront looks custom, checkout looks generic): solved with the checkout and accounts editor. You get logo placement, color tokens, font pairing, and background imagery without writing a line of code.
- Low average order value: solved with checkout apps or UI extensions that surface upsells, gift-wrap add-ons, or donation prompts at the right step.
- Inconsistent discount behavior or shipping edge cases: solved with Shopify Functions, which run server-side logic that a theme edit or app block cannot replicate.
- B2B rules, tax exemptions, or custom payment gating: almost always requires Functions plus custom validation, sometimes paired with the GraphQL Admin API.
- Pixel-perfect brand fidelity down to border radius and favicon: requires the CheckoutBranding API, which is Plus-only.
Availability is the detail that trips people up. Basic customizations, like the logo and color changes in the checkout and accounts editor, are open to every plan. Advanced app placements on the information, shipping, and payment steps, plus the full CheckoutBranding API, are gated to Shopify Plus. If you’re on a lower plan and a tutorial assumes Plus-only features, you’ll hit a wall fast. Check plan compatibility before you invest development time in any specific route.
How Do You Customize Shopify Checkout Branding?
Most merchants start here, and for good reason: it takes twenty minutes and doesn’t touch code. Log into your Shopify admin, go to Settings, then Checkout, and open the checkout and accounts editor from the customization panel.
Follow this sequence:
- Upload your logo in the header section and set its alignment (left, center, or your storefront default).
- Set your color palette using the color picker for background, accent, and button states. Match your storefront hex codes exactly rather than eyeballing it.
- Choose typography from the font library, or upload a custom font file if your brand uses something specific.
- Add a background image if your brand relies on visual texture rather than flat color. Keep file sizes small so checkout doesn’t lag.
- Insert app blocks by clicking the plus icon at your target location, whether that’s the thank-you page, order status page, or order summary sidebar. Drag to reposition.
Plan availability matters here too. Every plan can place app blocks on the thank-you and order status pages. Placing them on the information, shipping, and payment steps themselves is a Plus-only capability, per Shopify’s own documentation.
Before you publish, run a short QA pass:
- Preview on mobile, not just desktop. Checkout layouts break differently on small screens.
- Test with Shop Pay, Apple Pay, and at least one manual payment method. Wallet buttons sometimes overlap custom elements.
- Check contrast ratios on your button and text colors. A checkout that fails accessibility standards costs you conversions, not just compliance points.
- If you sell into multiple markets, confirm your market overrides didn’t get overwritten by the parent configuration.
Pro Tip: Screenshot your “before” checkout settings before you touch anything. Shopify doesn’t version-control every editor change, and reverting a bad font decision at 11 p.m. is a lot easier with a reference image.
Checkout Apps vs. Custom UI Extensions: Which Do You Need?
This is where a lot of store owners overspend or underdeliver, usually because nobody explained the actual scope difference between a public app, a custom app, and a Checkout UI extension.
A public app is something you install from the Shopify App Store, built by a third party for general use. A custom app is built specifically for your store, either by your team or a partner like Bowtie, and isn’t listed publicly. A Checkout UI extension is the underlying technology both types use to actually render something inside checkout. Apps are the delivery mechanism. Extensions are what gets delivered.
App blocks can be placed at several points: the checkout information step, the order summary, the thank-you page, and the order status page. What they commonly add:
- Post-purchase upsell offers
- Loyalty point displays or redemption
- Custom fields for gift messages or delivery instructions
- Age or ID verification prompts
- Subscription opt-ins
When you’re evaluating a public app, check three things before installing: what permissions it requests, how often the developer ships updates, and whether support responds within a day or two. An app that hasn’t been updated in over a year is a liability sitting inside your highest-stakes page.
Build a custom app instead when the public app market doesn’t have what you need, when you need tighter control over data handling, or when a general-purpose app’s pricing tier doesn’t match your transaction volume. A narrowly scoped custom extension is often cheaper long-term than paying recurring fees for a bloated app that does ten things you don’t use.

What Tools Do Developers Need for Custom Checkout Logic?
If your customization needs go past visual tweaks and block placement, you’re now in developer territory. Here’s the actual toolkit.
Checkout UI extensions use Polaris components and web components, targeting specific placements in checkout. Targets fall into three categories: static (fixed positions), block (draggable, merchant-configurable), and runnable (logic that executes without rendering UI, like validation triggers). Some targets, particularly those on earlier checkout steps, are restricted to Plus stores.
Shopify Functions handle backend logic that UI extensions can’t touch. Shopify’s developer documentation breaks Functions into four practical categories:
- Discount functions: custom stacking rules, tiered discounts, buy-X-get-Y logic beyond native options
- Shipping functions: rate hiding, custom rate calculation, delivery method filtering
- Payment functions: conditionally hiding or reordering payment methods based on cart contents
- Validation functions: blocking checkout for out-of-stock combinations, restricted regions, or B2B minimums
The CheckoutBranding API handles what the visual editor can’t reach: border radii, favicon control, per-section color overrides, and finer typography control. It’s a GraphQL-based API, and it’s Plus-exclusive.
For workflow, Shopify CLI scaffolds your app and extension structure, spins up a local dev server, and creates a tunnel for live testing without deploying anything public. Use a development store for the entire build cycle. Never test Functions or extensions against a live configuration first.
Pro Tip: Extension-only apps, scaffolded through Shopify CLI, are the fastest way to ship a single Checkout UI extension without building a full app around it. Skip this and you’re maintaining unnecessary infrastructure.
Can You Customize the Thank-You and Order Status Pages?
Yes, and it’s one of the highest-leverage places to add revenue you’re currently leaving on the table. Post-purchase extensions render content after payment completes but before the customer leaves, and again when they revisit their order status page.
Common uses:
- One-click post-purchase upsells (a discounted add-on with no re-entry of payment details)
- Subscription conversion offers
- Post-purchase satisfaction surveys
- Order tracking widgets and shipping updates
Placement works the same way as other app blocks: through the checkout and accounts editor, dropped into the thank-you or order status sections. According to Shopify’s developer documentation, some post-purchase features require requesting access before they go live on a production store, even though they work without restriction on development stores. Build and test the full flow on a dev store first, then submit for access well ahead of your launch date, not the week before.
How Should You Test Checkout Changes Before Launch?
Checkout is the one page where a bug costs you actual revenue in real time, not just a bad user experience. Test methodically.
- Build and preview every change on a development store first. Never edit a live checkout configuration directly.
- Run the full payment matrix: credit card, Shop Pay, Apple Pay, and any manual methods you support. Extensions and app blocks sometimes render fine with one method and break with another.
- Install a web pixel extension to track conversion events at each checkout step, not just the final purchase.
- Track four metrics after launch: checkout conversion rate, error rate at each step, average order value, and step-by-step abandonment. A tool like Bowtie’s site alert monitoring can flag anomalies before they compound into a bad week of sales data.
- Set a rollback point. Know exactly which configuration you’re reverting to if conversion drops after a change goes live.
Watch abandonment by step, not just overall. A spike specifically at the shipping step usually points to a Function or rate display bug, not a design problem.
Do You Need Shopify Plus for Checkout Customization?
Not always, and this is where a lot of merchants waste money upgrading prematurely. Here’s the actual line.
Available on every plan:
- Logo, color, font, and background changes in the checkout and accounts editor
- App block placement on the thank-you and order status pages
- Most Checkout UI extension types, though not all
Plus-only:
- App block placement on the information, shipping, and payment steps
- The full CheckoutBranding API
- Certain UI extension targets on earlier checkout steps
- Market-specific checkout overrides in the editor
The decision rule is simple: if your need can be met by a well-built app or the editor, don’t upgrade to Plus just to unlock a feature you’ll use once. If your business genuinely requires custom validation logic, multi-market checkout behavior, or granular branding control that directly affects revenue, the Plus tier plus a Function or two is usually cheaper than the workarounds you’d build to avoid it. A rough resourcing guide: editor changes need no developer at all, apps need someone comfortable reading permissions and settings, and Functions or the Branding API need an actual Shopify developer who’s built extensions before.
Pre-Launch Checklist for Checkout Changes
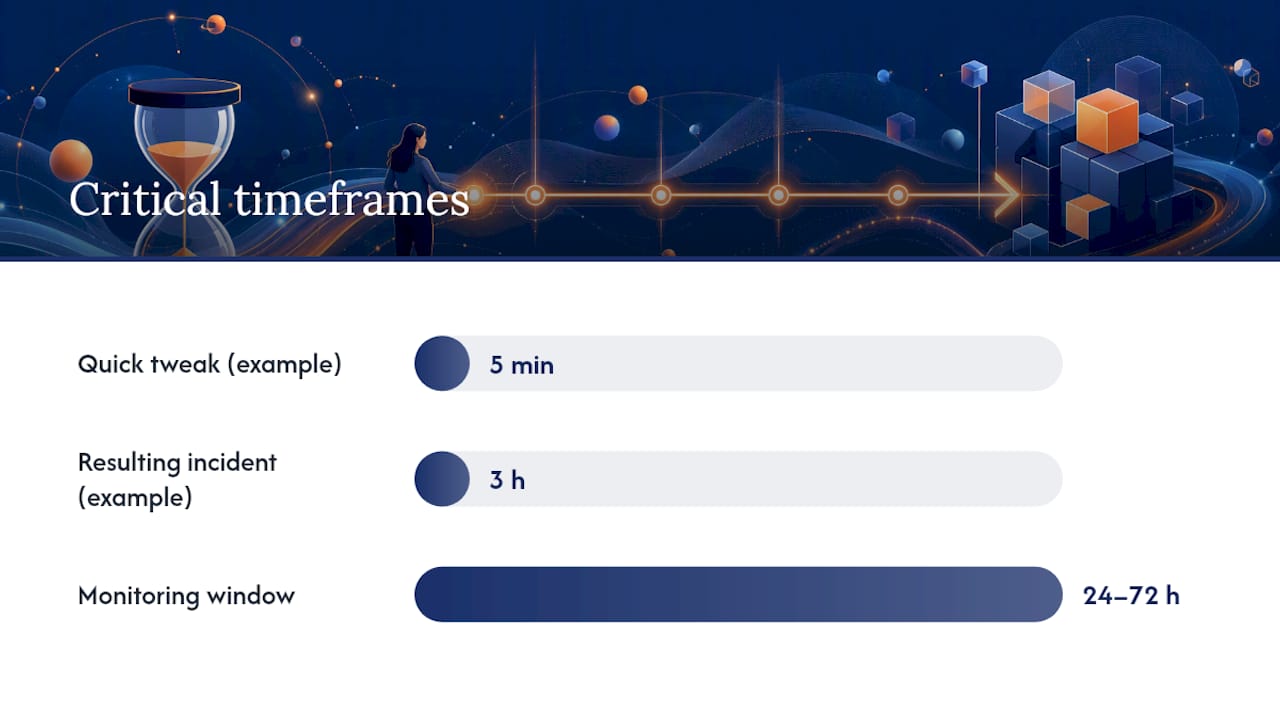
Skipping steps here is how a five-minute color change turns into a three-hour incident. Work through this in order.
- Back up your current configuration and confirm you’re building on a development store, not production.
- Run the full QA matrix: every payment method, mobile and desktop, and at least one test order per shipping zone if you sell internationally.
- Verify pixel and analytics tracking fires correctly at each step before you publish.
- Publish in stages if your platform allows it. Roll out to a percentage of traffic before going to 100%, if your app or Function supports staged activation.
- Monitor closely for the first 24 to 72 hours. This is when checkout regressions show up, usually tied to a specific device, browser, or payment method combination.
Common pitfalls worth naming directly: an app that hasn’t been updated in months breaking after a Shopify API version bump, mobile layouts that looked fine in preview but clip on smaller screens, and Functions that pass testing on a clean cart but fail on edge-case combinations like a fully discounted order. If checkout performance degrades after a customization, revisit page weight and asset loading, since a caching strategy misstep elsewhere on your store can bleed into perceived checkout speed too.
Pro Tip: Keep your rollback configuration saved as a named draft, not just a memory of “how it used to look.” When something breaks at 2 a.m., you want one click, not a reconstruction project.
When Should You Bring in a Development Partner?
Editor changes and a solid app cover most merchants. You need a partner when the ask turns into custom Functions, CheckoutBranding API work, or validation logic tied to your specific business rules, situations where a wrong implementation doesn’t just look bad, it blocks sales entirely.
We’ve seen the same pattern repeatedly: a store owner installs three apps trying to replicate what one well-scoped Function would do cleanly. Or a Plus merchant pays for the tier and never touches the Branding API because nobody on the team can write the GraphQL calls. That gap between what the platform offers and what a team can actually execute is where most checkout projects stall.
A real engagement looks like discovery to understand your actual checkout friction, a working prototype on a dev store, full QA across payment methods, a staged launch, and support afterward, because Shopify’s API surface changes and unmonitored extensions rot. Bowtie has built custom Shopify work for stores ranging from lean startups to enterprise-scale operations, and the checkout is rarely a one-and-done build. It needs someone watching it.
— Chad
Get Expert Help With Your Shopify Checkout
If you’ve read this far and you’re staring at a Functions requirement or a Branding API spec that your current team doesn’t have bandwidth for, that’s exactly the gap Bowtie closes. Instead of stitching together three apps to approximate one clean custom Function, you get code built specifically for your discount logic, shipping rules, or validation needs, maintained by a team that watches it after launch instead of disappearing once it ships.
Bowtie’s AI integration and Shopify development work covers exactly this kind of engagement: custom Functions, CheckoutBranding API implementation, and post-launch monitoring so a checkout regression gets caught in hours, not after a week of quietly lost revenue. If you’re deciding whether to build in-house or bring in outside help, our guide on choosing the right development partner walks through what to ask before signing anything. When you’re ready to scope your checkout project, reach out and we’ll map out what a discovery call would look like for your specific setup.
Key Takeaways
Shopify checkout customization succeeds when the technical route, editor, apps, Functions, or the Branding API, matches the actual business problem instead of the most advanced option available.
| Point | Details |
|---|---|
| Start with the editor | Logo, color, font, and background changes need no developer and work on every plan. |
| Match the tool to the problem | Use apps for upsells and data collection, Functions for discount, shipping, or validation logic. |
| Check plan availability early | Advanced app placements and the CheckoutBranding API require Shopify Plus. |
| Test on a dev store first | Run the full payment matrix and pixel verification before touching a live configuration. |
| Bring in Bowtie for custom logic | Bowtie builds and maintains custom Functions and Branding API work when apps alone fall short. |
Sources
- Customizing and editing your checkout and accounts pages — Shopify Help Center
- How to Customize Shopify Checkout: 5 Options for 2026 — Shopify
- Shopify